This article walks you through the advanced steps for tracking your calls from Google Adwords paid advertising campaigns. We will also help you evaluate how many DNI tracking numbers your website needs if you have a high traffic website based on concurrent users from your Google Analytics 4 account.
How Does Dynamic Number Insertion (DNI) Work?
Each time a website visitor enters your website through your Google or Bing PPC ads, the Dial800 DNI feature automatically updates your website’s phone number to a unique tracking toll free phone number. When the visitor calls that number your call tracking automatically passes the keyword they searched to find you, the ad that was clicked, and the PPC campaign.
If you are using Google pay-per-click (PPC) ads, you may want to track more data than the standard DNI tracking collects. This can help you better evaluate the effectiveness of your ads to allocate spend and evaluate their ROI.
Advanced Tracking Number Calculation
It is important that you have enough tracking numbers to provide a unique number to each website visitor. We can determine this by using statistics from your Google Analytics 4 account! While there isn’t a 100% exact assessment available of concurrent users because the most precise time window of session tracking in Google Adwords is by the hour, the calculation below provides a very close match if you want a more exact formula for the number of DNI tracking numbers you need.
Average Concurrent Users Calculation:
Concurrent Users = Average Hourly Session X Average Session Duration (in seconds) / 3600
Example Calculation:
(240 sessions x 83 seconds) / 3600 = 5.5 average concurrent users
Maximum Concurrent Users Calculation:
This calculation is helpful for those that run large spend, short duration campaigns that generate bursts
of website traffic.
(295 sessions x 171 seconds) / 3600 = 14 max concurrent users
Setting Up Your DNI
Before you can set up advanced DNI tracking for PPC ads, you need to set up the basic DNI call tracking. This includes the pre-steps of creating tags and your ring pool along with the three steps for setting up DNI.
Please follow the steps outlined in the Setting Up DNI article, then come back here for the final advanced steps.
Advanced DNI – Tracking PPC Advertising Data Points for Campaigns, AdGroups & Keywords
Once you’ve tested your new DNI digital tracking, head to Google Adwords to make an update.
- Login to your Google Ads account and click on Campaigns
- Click on the campaign you’d like to add DNI tracking, and select the 1st AdGroup within the campaign
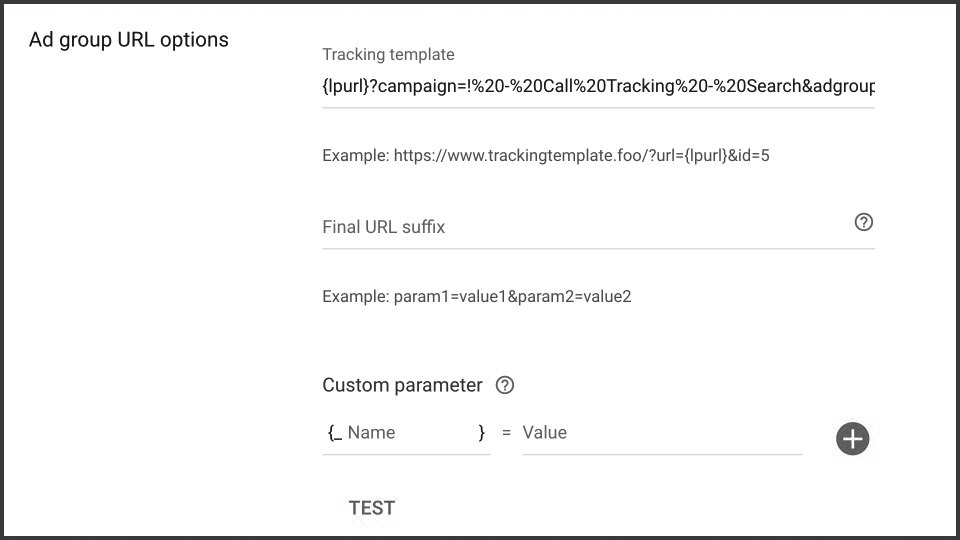
- Select Settings, Additional Settings, then AdGroup URL options

- Paste the following URL into the Tracking Template field based on the default parameters used when setting up your Ring Pool (enter your exact campaign and ad group names in the URL, and use ‘%20’ in place of any spaces to ensure proper parameter passing):
{lpurl}?campaign={insert campaign name}&adgroup={insert ad group name}&keyword={keyword}
- Test! Search for a keyword phrase that your ad shows on consistently, click on the ad, confirm that your website phone number automatically updates to a new tracking number, make a test call to the number dynamically displayed, and verify your new PPC attribution appears with the call details inside of CallView360®
Your advanced DNI Ring Pool setup is now complete for Google Ads. If you have any questions or need additional help, you can contact Dial800 Customer Care or call 1-800-DIAL800.
 CallView360®
 VoiceInsights AI
 AccuRoute®
 BizCloud
 RapidRecall®
 Integrations