This article walks you through the basic steps for setting up Dynamic Number Insertion (DNI) for digital marketing attribution including organic, direct, referral, and pay per click ad tracking such as Google Ads, Bing Ads, Facebook or Instagram, and more.
Why Setting Up DNI Helps Track Your Data
Why should you use DNI? DNI enables you to automatically and effectively track website users that convert to phone calls, and ultimately to customers. By using DNI, you now have full insights into which source, landing page, keywords and phrases the customer used along with which ad groups and campaigns generated clicks and calls.
Within Dial800, DNI passes complete call details and attribution from all your online sources, along with optional additional data points from your PPC campaigns. Update your Google Call extensions with static campaign specific tracking numbers and watch all inbound calls generated before the user even visits your website.
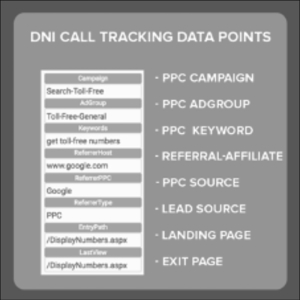
You also have instant access to caller ID, demographics, talk time, and more. Here’s a full list of Dial800’s digital attribution data points currently available:
Setting up DNI requires several steps because it is customizable. Follow the preliminary steps prior to setting up your DNI.
Pre-Step 1: Calculate & Purchase Your Toll-free Numbers
Review your website’s traffic to determine the number of tracking numbers you need. A good rule of thumb: if you have less than 5,000 website visitors per month, start with 5 tracking numbers plus an overflow number.
If you start to see the overflow number appear, you’ll know it’s time to add additional DNI tracking numbers.
Helpful tip: you can create a real-time event notification that can alert you when the overflow number is used!
Advanced Tracking Number Calculation
While there isn’t a 100% exact assessment available of concurrent users because the most precise time window of session tracking in Google Adwords is by the hour, the calculation below provides a very close match if you want a more exact formula for the number of DNI tracking numbers you need.
Average Concurrent Users Calculation:
Concurrent Users = Average Hourly Session X Average Session Duration (in seconds) / 3600
Example Calculation:
(240 sessions x 83 seconds) / 3600 = 5.5 average concurrent users
Maximum Concurrent Users Calculation:
This calculation is helpful for those that run large spend, short duration campaigns that generate bursts of website traffic.
(295 sessions x 171 seconds) / 3600 = 14 max concurrent users
Pre-Step 2: Create a New Tag for Your DNI Numbers
- Navigate to AccuRoute® and select Tags – these are the customizable labels you set up to tag
and track phone numbers - Click on New Tag and name the tag ‘digital tracking, online tracking or website number’ to help
identify your digital tracking numbers - Select DNIS as the Number Tag Type to attach the tag to the tracking number
- Click Save
- Find your new tag in the list and click on Values
- We recommend adding these two new values: ‘digital tracking’ and ‘overflow’ (you can always go back and customize this late to add more values)
Pre-Step 3: Assign Routing Profiles & Tags for Your New Tracking Numbers
Are you routing your calls generated from digital marketing in a different way than your standard calls? If you are, you need to create a new routing profile for your DNI generated calls or choose from an existing profile.
Navigate to AccuRoute and select the Numbers option, then follow these steps.
- Select one of your new tracking numbers
- Click on Properties and then Assign a Routing Profile (learn more about customizing your routing)
- Click Save
- Click Tags and select the new tag you created in the pre-step 2
- Click Save
- Repeat steps 1 – 5 for the remaining DNI tracking numbers for your DNI feature, remembering to select one of your tracking numbers as the Overflow and assign the overflow tag to that number
Once you have followed the preparation steps, you are ready to set up your DNI.
Step 1: Set Up Your DNI in Dial800
- Navigate to AccuRoute and select Ring Pools
- Click Create New Ring Pool
- Add your designated overflow number to the ring pool settings – DO NOT add this to your assigned numbers within the Ring Pool
- Enter your Source Number, the phone number currently displayed on your website that will be replaced by a dynamic tracking number
- Lease duration: This is how long users stay on your website. This data point can be found within your Google Analytics account. See also advanced tracking number calculation for more details. The DNI tracking number will appear and stay on the website when a user accesses the site for the length you set in the lease duration.
- Enter your PPC ValueTrack, UTM or custom parameters in the Parameter Name section (if you’re using advanced DNI, enter the following to get started: Campaign,AdGroup, Keywords)
- Attribution Types: This is where the caller originated from. All attributions are checked by default, and no calls will be filtered out by attribution type. You can choose one or as many as you want to be filtered by, but a minimum of one must be checked.

- Click Save
- Once saved, click on your new Ring Pool’s Assigned Numbers button and attach your new tracking numbers to the Ring Pool
Step 2: Add Tracking Script to Your Website
- Open up your new Ring Pool properties
- Copy and paste your custom tracking script located at the bottom of your Ring Pool into the <Head> section of your website, or place inside your Google Tag Manager account
Step 3: Test your DNI
- As soon as the tracking snippet is installed, search and click on a link for your website to verify that your static (source) phone number dynamically updates with one of your new tracking numbers
- Call the number to test it
- Click on CallView360®, then click on Calls to view Call Detail and find your test call
- Scroll to view the Web Tags that should now appear in your call detail
Your DNI Ring Pool is now active and digital tracking data points will automatically flow into your CallView360 account. If you have any questions or need additional help, you can contact Dial800 Customer Care or call 1-800-DIAL800.
 CallView360®
 VoiceInsights AI
 AccuRoute®
 BizCloud
 RapidRecall®
 Integrations