This article explains the remote dial and remote decision options in Dial800, and explains the basic steps for applying them to your routing profile in AccuRoute®.
When to Use Remote Dial and Remote Decision
Within Dial800, routing profiles define the flow of logic and prompts that an inbound call will progress through to reach its destination. These routing rules are based on a wide variety of factors including time of day, caller’s location, which phone number they called, and more.
By using remote dial and remote decision, there is no need to upload any data into Dial800. Our API can instantly check your external software and systems for existing rules and criteria you have for where a call should be delivered.
With remote dial and decisions, you can leverage caller data by delivering the call and other data collected from the call, match data from your inbound call with your CRM to target the call to the best recipient for their specific profile, and prioritize existing customers by checking your CRM to determine if they are an existing customer and routing them differently.
Using Remote Dial in a Routing Profile
Before creating a routing profile, you must ensure you have all desired targets and groups created first.
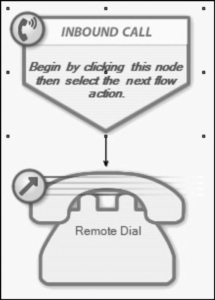
Once you are ready, follow these steps to create a new routing profile that utilizes remote dial.
- Navigate to AccuRoute
- Select Routing and click Create a New Routing Profile
- Name the profile and click Save
- You will be directed to the Profile Designer Page, select the Home Plate titled Inbound Call
- In the drop-down menu, select Remote Dial

- Click the telephone icon titled Remote Dial

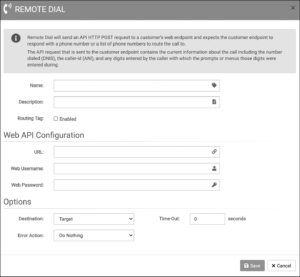
- Input your API web endpoint information in the Web API Configuration section
- In the options section, select if the destination will be a target, hunt group, or simultaneous ring group
- Adjust the timeout to 20 seconds
- Complete an error action to ensure that calls won’t be dropped if the API fails to respond
- Click Save
- In the top right corner, click the Save Profile button and then click Save in the pop-up window
- Navigate to the AccuRoute homepage and select Numbers
- Search the DNIS you want to assign to the profile you created and select the Properties of that DNIS on the left-hand side
- Find the profile name in the drop down and click Save
Using Remote Decision in a Routing Profile
Before creating a routing profile, you must ensure you have all desired targets and groups created first.
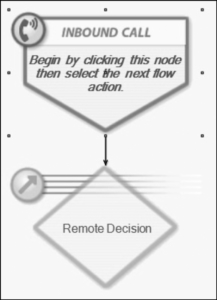
Once you are ready, follow these steps to create a new routing profile that utilizes remote decision.
- Navigate to AccuRoute
- Select Routing and click Create a New Routing Profile
- Name the profile and click Save
- You will be directed to the Profile Designer Page, select the Home Plate titled Inbound Call
- In the drop-down menu, select Remote Decision

- Select the orange icon titled Remote Decision

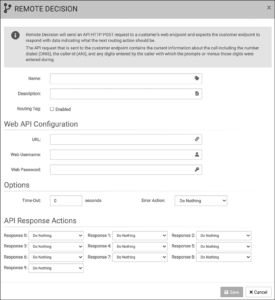
- Input your API web endpoint information in the Web API Configuration section
- In the options section, adjust the timeout to 20 seconds
- Complete an error action to ensure that calls won’t be dropped if the API fails to respond
- In the API Response Actions section, choose where the call will be sent for each response from the web endpoint. When the call is sent to the API with the information, they will respond with directions on where to send the call. Each response is sent as a number and the numbers on your routing profile need to coincide with those directions built in on your web endpoint.
- Click Save
- In the top right corner, click the purple Save Profile button and then click Save in the pop-up window
- Navigate to the AccuRoute homepage and select Numbers
- Search the DNIS you want to assign to the profile you created and select the Properties of that DNIS on the left-hand side
- Find the profile name in the drop down and click Save
Your routing profile is now saved and you are ready to use your remote dial and decision call routing. If you have any more questions or need help, you can contact Dial800 Customer Care or call 1-800-DIAL800.


 CallView360®
 VoiceInsights AI
 AccuRoute®
 BizCloud
 RapidRecall®
 Integrations